12 Pounds of Chuck For Pulled Beef Using The @SlowNSear 2.0

My lovely wife Kate got me a Slow N Sear for my 22 inch kettles and I’m finally getting around to reviewing and using it.

To purchase and read other first hand  reviews- click here

Here’s the video-

The first thing you notice about it when you take it out of the box is the build quality.  It’s made out of heavy duty stainless steel and won’t be rotting away any time soon.

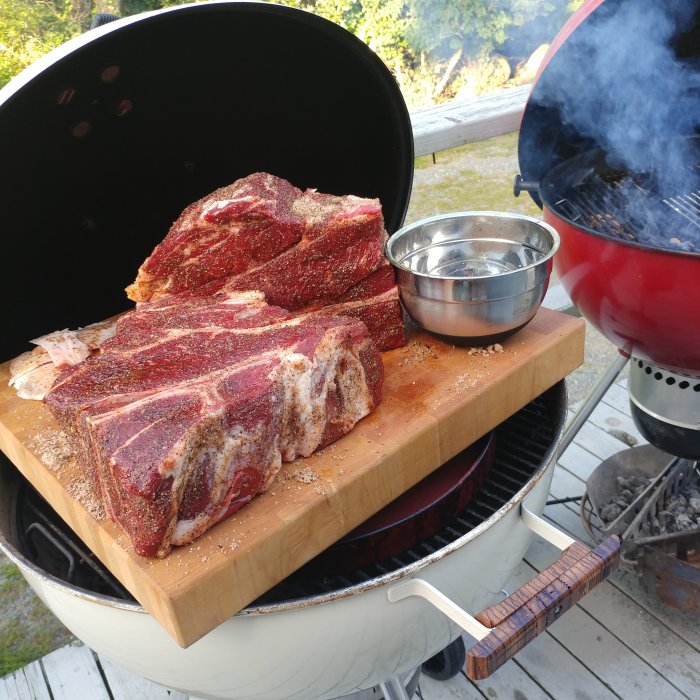
The main reason for getting the Slow N Sear for my purposes is for cooking large hunks of meat that take up a lot of grill space.  For this cook it was two large seven bone chuck roasts that if I was using the snake method, after about five hours the snake would wrap around and end up directly under the meat, causing fat to drip and meat to burn- no bueno.

The Slow N Sear keeps the charcoal contained to one side.  It also protects the porcelain coating on your nicer grills from having lots of coals banked up along the side with it’s heavy stainless construction.  It also keeps a nice moist cooking environment with it’s removable water pan (in the 2.0 version).  The water pan can also be removed giving you more room for coals and longer cook times without refueling.

For this cook I tried to follow the manufacturer instructions closely.  I lit a Weber starter cube in one corner and arranged about 7 coals around it.  When placing the coals around the lit starter cube be careful to not snuff out the starter cube.  I didn’t snuff it out but I could see how it could happen if you weren’t careful.

After the coals were going sufficiently I filled the rest of the Slow N Sear 2.0 with briquettes leaving a little space for some peach wood (thanks Joe Ball) and cherry wood chips.
20180901_0736374747062903216679763.jpg

Next I boiled a quart of water and carefully poured it into the water pan.  it sizzled (just like the manufacturer said it would) so I’d recommend you pour it using a oven mitt in case of splatter.

After that closed the lid and let the kettle come up to 175 degrees before adjusting the vents.  I closed the top vent 1/2 way and the bottom vent about half way and later adjusted the top vent to closed about 3/4 of the way.

I started at 7:40AM and she was hovering around 225 when I put the two six pound chucks on the opposite side of the grill with foil and foil pans lining the opposite side of the charcoal grate to catch the liquid gold drippings which we’d later reincorporate into the pulled beef.

20180901_0741176422769417648633666.jpg

At 10AM she was rocking along at about 250-260 and at 12:30 the temps dropped a little to the 210 range.  I still had spent coals and some that weren’t lit yet in the end of the Slow N Sear opposite the end where we initially started the coals with the starter cube.  The charcoal grate temps dropped to 210 and then 200 right around the time the chucks were entering the stall at 160 degrees F internal.  scratching my head I figured out why.  It was dropping because the spent ash needed to be knocked down.  It was restricting air flow.  This is shown in a video by Baby Back Maniac in a YouTube who shows that you clear your spent ash when you refuel.

20180901_120422_hdr5620731940902924162.jpg

So I added about a third of a chimney of unlit briquettes to the Slow N Sear after knocking down the spent ash and we were back on track.

At 2:30 the chucks were at 173 degrees F internal and I wrapped them in double foil and placed them back on the kettle and opened the top vent all the way and the bottom vent about half way letting the kettle climb up to around 270-280.

20180901_1719213076648038534935791.jpg

Once the chucks reached 205 I pulled them off, put them on a cutting board, poured the drippings from the foil pan and juices from inside the foil wrap into a bowl and mixed it with the beef as I shredded it.  The chucks rendered down perfectly and were all jiggly and moist and incredibly flavorful.  The guests devoured the pulled beef on rolls made by my friend Susan Lipsett and mango slaw from my Sister Felicia and Sweet Baby Rays Vidalia Onion BBQ Sauce.

20180901_172902414290373423519177.jpg

The Slow N Sear is an excellent piece of equipment.  It is well built, well designed and helps maintain temps for long cooks with large cuts of meat weather it be ribs or brisket of big slabs of chuck.

I recommend it if you cook a lot of large cuts of meat like full packer briskets or multiple pork butts.

To purchase and read other first hand  reviews- click here


Big Time Private Sale Alert On The Thermoworks Smoke Right Now!

By subscribing to the Thermoworks list you get special offers that are not offered on their main page.

My good friend Joe Ball alerted me to a big sale on a commercial grade remote thermometer- the Thermoworks Smoke.

I’d always used a Maverick 732 which is a decent consumer grade remote thermometer that retails for around $60.

The Thermoworks Smoke is professional grade.  The build quality is conservatively speaking about three times greater and it can be had for $79.99 including shipping.

I can’t stress enough how good of a unit this is.  if you have a grill master in your life, trust me buy this and put it away for a birthday or Christmas and they will love you for it.

Here’s a link to the private sale

Classic Thermapen Open Box Sale

They are open box units will full warantees-

“Smoke is our newest alarm thermometer, and we have accumulated a small number of Smoke units here that, for various reasons, we will not sell as new units. Open Box Includes:

sales demos
customer returns
cosmetic seconds
slightly damaged packaging
refurbished units
While not the same as new, all units are like-new and include the full warranty. They include Smoke, Smoke Receiver, Pro-Series High Temp Cooking Probe, Pro-Series High Temp Air Probe with Grate Clip, and operating instructions. In most cases, you won’t be able to differentiate these from new stock.

This is a private sale for our email subscribers, but you are welcome to forward the link to friends and family.”

Only $76 each!Shop Now

Limit 5 per customer. Hurry!

@WeberGrills Charcoal Go-Anywhere Indirect Chicken Wing Set-Up

This is how I set up my charcoal Weber Go-Anywhere for high heat indirect cooking.  Here we cook a full package of chicken wings offset the coals using tin foil and a foil tray to catch the drippings.

Link for the foil trays that fit perfectly inside the Go Anywhere at this link

(120 Pack) Premium 2-LB Takeout Pans with LIDS l Standard 8.6″ x 6.1″ x 2″ l Top Choice Aluminum Foil

Pork Shoulder #BurntEnds Recipe For The Win!

They Take A While.  But They Are Soooo Worth It!

Fired up the Weber Kettle using the snake method.  Cherry for smoke.

Trimmed the fat collar off the pork shoulder and put on a dry BBQ rub.

Placed a drip tray on the charcoal grate under the shoulder and let smoke roll starting at 9:30AM.  The kettle ran between 220-26 all day with very few adjustments.  Didn’t open the lid til 1:30.

20180822_132917-014986542457322779608.jpeg

Spritzed the shoulder with root beer every 30 minutes or so until we got to an internal temp of 170.   She sat n the stall at 160 degrees for over an hour or so.

Once the shoulder was 170, I pulled it off and cut one inch (roughly) chunks out of it.  Took the drip pan that was under the but and put all the cut up ends in along with a small bottle of Sweet Baby Rays BBQ sauce, a half can of root beer and a bunch of rub and mixed it all up.

20180822_1424276885562171943621413.jpg

At this point with the meat at 170 it still isn’t tender.  Placed two layers of foil covering the top of the foil pan.  At this point it was 2:30 and we had been cooking since 9:30 about a three pound shoulder.  5 hours.

Left the meat to braise, covered for another hour til 3:30.

After the hour braising I uncovered it and gave it a good toss to make sure all the bits were coated.  The liquid in the pan at this point you want to caramelize and reduce.  The foil is removed and every half hour or so I gave it another toss.  This is where the magic happens, the sweetness from the sauce and the root beer combine with the saltiness from the rub and the smoke and Oh My God It’s Truly Meat Candy.

It was done at 5:15PM or 7 hours and 45 minutes.

20180822_171859-015520686481662710378.jpeg


My pick For Instant Read Thermometers- The Javelin Pro

Using an instant read thermometer takes any guesswork out of your cooks.  You pay lots of money for good cuts of meat, you can eliminate the chance of ruining your meat by overcooking it or serving something that is woefully under cooked by using an instant read thermometer and knowing at what temps certain meats are done to your liking.

On most BBQ forums people rave about the Thermoworks Mk4 instant read thermometer.  It’s a great thermometer.  A friend has one, I’ve used it.  It’s also $100 and if you’re lucky there’s a %15 off sale so you can get it for $85.

After reading a ton of reviews I bought a Javelin Pro instant read thermometer.  It’s virtually the same durable build quality and its half the price.  I absolutely love mine.

Read reviews and purchase the Javelin Pro instant read thermometer here

javelinpro

On America’s Test Kitchen they reviewed a ton of instant read thermometers and the reviewer calls the Javelin Pro the best mid priced unit and also goes on to say the MK4 is the best, but now they also say Lavaworks is better for the price.


Here’s a review-


Color:  Chipotle|Verified Purchase
I could write a long review but I figure I’ll just give the quick and dirty. I’m a long-time Thermapen owner, so I know and expect more from a thermometer, and this Javelin measures up in every category!!! I got this on a lighting deal as an Xmas gift and my old regret is not buy 4 more of them for others. I did not get a free item to write a review.

I tested this against my 3 year old Thermapen. It not only registered faster, but both read within a tenth of one another for readings, confirming it’s accurate. I give bonuses to the backlit display and much lower price point. Add in that is read quicker or just as fast as the industry standard Thermapen, and this thing is a winner in my book. Only advantage to the Thermapen is that it came with a case, but considering the price point, I can live without that little add-on item.

Buy one of these and don’t look back. Great deal!!

Fajita Night With My Kate

Nancy Dudley Submits May 1983 Photo Of Fred Bodin With His @WeberGrills Go-Anywhere

fredweber.jpg

Hi Joey, I am enjoying your blogs as always and have attached a photo just for fun. It is a very old, moldy and underexposed kodachrome and I am not sending it for a blog post hopeful, just to accompany some info. I don’t know if you knew your old friend of blog Fred B. was nuts about Weber cookers. Around the end of the 1970’s or beginning of the 80’s he had a Smokey Joe and then discovered whatever the rectangular one is- ( sorry, I am not into grills). He referred to it as THE WEBER, all caps bold and italic whenever he spoke of it which was often and to whoever would listen. He would demonstrate not only it’s juicy but grilled cooking features, but his favorite feature the utter GENIUS legs which would fold up to lock on the lid, as well as how it’s shape made it great for packing his van for camping trips. The list goes on. Anyway. I hope you get a chuckle out of this photo he insisted on having taken with THE WEBER. Raise a glass at the next griller meet!
cheers Nancy Dudley, Essex

Fred not long before he passed-

dscf2973_2